Start out with a good sketch or outline of the critter you want to template. Here's the sketch I'll be doing this tutorial with:

How to Create a Lineless Template
Done in Photoshop CS2. This tutorial assumes that you already have a fairly good grasp of shading and where to put shadows and highlights, but could use some help and software tips to make the jump from templates
with outlines to lineless templates.
Step 1
Start out with a good sketch or outline of the critter you want to template. Here's the sketch I'll be doing this tutorial with:
Step 2
Make a couple new layers. In Photoshop, go to Layer -> New -> Layer to create a new layer.

One layer will be for our background color. I'm filling it in white and putting it as the bottom layer. (Drag and drop the layers in the layers menu to rearrange them as needed.) The second new layer
I am naming Base. This will be our "silhouette" layer. The Base layer goes in the middle, and the outline layer goes on top. I like to rename the outline layer as Outline. Next, select the Outline layer
in the layers menu, and reduce its opacity so that the outline is visible but faint.

Here's how our outline looks with reduced opacity:

Step 3
Next, select the Base layer. For this step, I like to use the brush tool on the "Hard Round 13 pixels" setting. Pick a color that's not too light or too dark
to color with. I like to pick a medium green.

Now it's time to fill in the critter's silhouette. Be careful to make the outside edges look smooth and nice, and don't leave any holes in the middle of the critter. Get the whole thing filled in. Try turning
off the outline layer to make sure your silhouette looks good. You might need to adjust the brush size to bigger or smaller for different areas of the critter. Here's our finished Base layer!

And here's the whole current image:

Step 4
Make a new layer for the shading. I like to name it Shading. This layer needs to be set as a clipping mask to the base layer. That will allow the shading to only show inside the silhouette, regardless
of where on the shading layer you color. If you have the base layer selected as you create the new layer, then in the create new layer dialog box you can select the option to "Use Previous Layer to Create Clipping Mask."

Another way to make the clipping mask is to first make sure the Shading layer is right above the Base layer. Make sure you have the Shading layer selected, then go to Layer -> Create Clipping Mask

The Layers menu should look like this when you are done:

If your graphics program does not support clipping masks, then you will need to find a different way to keep the shading from going beyond the borders of the silhouette, such as using the magic wand to select the silhouette
in the Base layer before going to the Shading layer.
Step 5
Block in the shading. Make sure you have the Shading layer selected. I like to use a soft round brush that's fairly large in comparison to the pet (in this case size 45) at an opacity of about 12%.
Select black for your color.

Now go around the edges of the critter and make sure every outside edge has at least a little shading. Here we are:

Next block in the major areas of shading. Make use of that faint outline to help guide you. You can change the size of the brush as needed. Don't worry about fine details at this point, but do be agressive with
the shading. Nearly the whole critter should have at least some shading on it. Also, you'll likely notice a few little holes in your silhouette that you
missed - don't be afraid to go back and fix them! Just make sure that you return to the right layer/brush/opacity to continue shading once you're done. Here's what my horse looks like now:

Step 6
Time for some Smudge Tool magic! Make sure you've still got the Shading layer selected. Use the smudge tool, with a large, soft brush (I'm going for size 65 this time) at a strength somewhere between 25% and 40%.

You can adjust the size and strength of the Smudge Tool brush as needed. Go over the whole shading layer with it to blend the shading and get it in exactly the right places and looking nice. Here we are
all smudged up and beautiful.

Step 6
But wait, what about the details? That shading would be fine if we had lines to support them, but as is they're just too fuzzy. Time to go back through the shading layer and add in details so this looks right lineless.
For this step I like a small soft brush, about size 9, at a higher opacity - about 20% and I usually zoom in on the critter so I get the shading placement juuust right.

In this step remember that you still don't really want straight-up lines, but do make sure that you put good shading detail everywhere needed, especially to mark boundaries that were defined by lines in the outline.
For areas of particular detail (in this example, the mane, tail, leg feathering, and eye of the horse) you might need an even smaller brush. If you want to be extra safe, you can put this detailed shading on a new shading layer,
so it won't mess up the block shading we did earlier if you mess up and need to erase. We won't be going over the whole thing with the Smudge Tool again, but Smudge magic is still your friend in this step. If some detail
shading starts looking too line-like, get out a small sized Smudge Tool brush and blend it smooth & nice. Don't be afraid to change brush size and opacity where needed if things are too line-like, or if the details need to
be finer, or whatnot. By the time you are done with this step, the outline layer should be virtually indistiguishable from the shading. You can turn off the outline layer at the end of this step. Here's the previously
zoomed area with the detail shading added:

And here's our whole critter now:

Step 7
Ok, that is looking pretty good! But we've only got shading so far. This baby needs some highlights! Make a Highlights layer, and make sure it's created as a clipping mask to the Base layer again.

For putting in highlights, I like a smallish soft brush, color white, at about 16% opacity. You can adjust around as needed for your critter. Highlights generally should be used much more sparingly than the
shading. Put highlights through the areas where there is little to no shading. Like the shading, you'll start out blocking in major highlight areas.

Go over the block highlights with the Smudge Tool to blend them in nicely, just like we did for the block shading. Love that Smudge Tool magic!

Finally, go back in with a smaller brush and add any needed highlight detail work. For the example horse, the mane, tail, leg feathering, ears and eyes need some. Again like the shading, change size, opacity,
and use the smudge tool as needed to make it all look good. Here we are will all our shading and highlighting.

Step 8
Check over your critter. Make sure you're happy with all the various layers. Take that white background layer and change it to different colors to make sure your template looks good on various backgrounds.
Pay special attention to the edges. I tend to particularly need to watch out that my shading goes all the way to the edge so my templates look good on dark backgrounds. A small smudge brush can work wonders for fixing
this kind of problem.
Step 9
Create a new layer as a clipping mask to the Base layer, and put it underneath the Shading and Highlight layers. This will be your layer to color on, so I call it Color.

With lineless templating, it can sometimes be a bit difficult to tell one body part from another, particularly with certain colors, and just in general it can save you a lot of coloring time
if you have certain body parts already marked off for easy selecting. I like to make a few "Mark" layers to mark off the divisions between these body parts. For this example horse, I'm going to
want a Mane/Tail Mark, a Hoof Mark, and an Eye Mark. Make a new clipping mask layer for each Mark you want to do, and then on each, color in the body part corresponding to that layer. I like to use a hard
brush, similar to the Base layer. Here's our example with Mane Mark in blue, Eye Mark in green, and Hoof Mark in yellow:

Step 10
You could stop there, but there's a little more I like to do so that I can quickly and easily make colored shading and highlighting. Photoshop allows you to select the contents of a layer by
holding the Control button, then clicking on the thumbnail of that layer in the layer menu (the thumbnail, not the name of the layer). Use the Control-Thumbnail click to select the Base layer. Then invert the selection
by going to Select->Inverse. You should now have selected all the area outside your critter. Now select the Shading layer, and hit the delete button. Repeat for the Highlights layer. Now any shading or highlights
that went outside the critter should be deleted. Your critter template should still look the same, since only stuff outside the clipping mask was removed.
Next, release the clipping mask on the Shading and Highlights layers, by selecting the Shading layer, then go to Layer -> Release Clipping Mask. Again your critter should remain looking the same, but the
Shading and Highlighting layers should no longer be clipping masked to the Base layer. This will allow us to clipping mask other layers to the Shading and Highlights layers. So, let's say we've got a detailed
coloring job with lots of colors that would be difficult to hand-coloring Shading for. Maybe something like this:

Note that all that coloring is done ONLY on the coloring layer. If I need to color a Mark layer area, then instead of coloring on that Mark layer, I'd use the Control-Thumbnail click trick to select a Mark area,
but still do my actual coloring on the Color layer. Now select the whole Color layer, and copy it (Edit -> Copy). Select the Shading layer next, then paste (Edit -> Paste). Whoa, hello!

What now? Now select that newly pasted in layer, and make it a clipping mask. (Layer -> Create Clipping Mask) Ok, that's a little better...

Now that the copy color is clipped to the Shading, let's darken it up so we can see our shading again! Go to Image -> Adjustments -> Hue/Saturation

Play around with the settings until the shading is nicely darked and colored in a way that looks good to you. Ah, there we go!

The difference between colorized shading and just regular black shading can be subtle, but it can really help keep your colors looking bright and beautiful. (I've found it especially helps yellows.) I like
to repeat the above steps to get colorized Highlights as well.
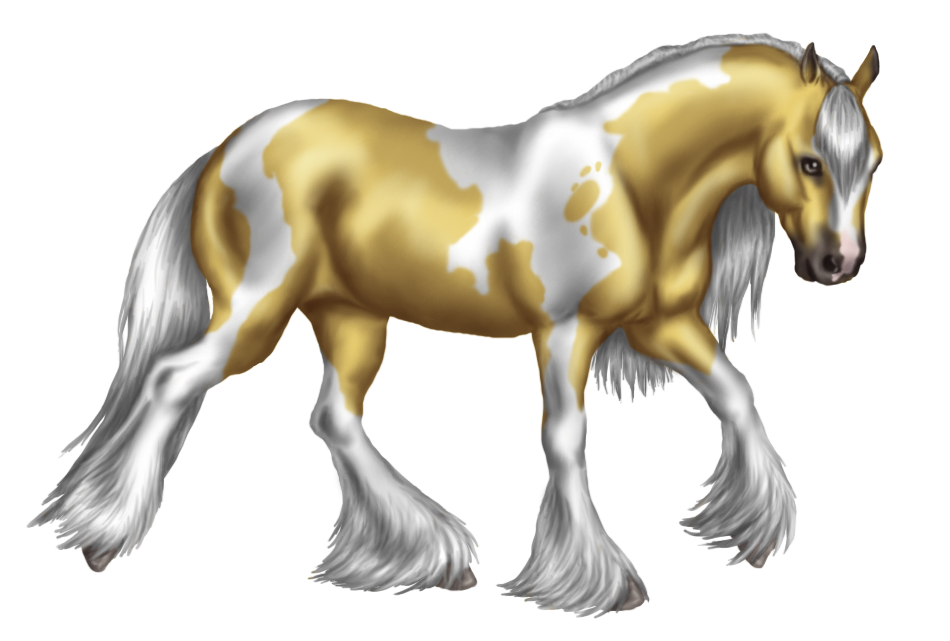
Oh, one last thing - you can turn off that background layer to get a nice transparent-background final critter.
Here's a final product, a pretty Tobiano Palomino gal, to send you on your way!
Questions? Comments? You can contact Silvanon at silvanon@hotmail.com
This webpage, all content and graphics copyright Silvanon. You may post links to this page, but please do not post the content itself on other websites.